Thursday, February 25, 2016

Paleo Maple Barbecue Sauce

When my husband and I first started dating, I noticed he was a barbecue sauce guy more than he was a ketchup guy.  I liked that!  It only took a few meals out to realize he was a barbecue sauce guy more than he was an any-other-kind-of-sauce guy.  No honey mustard, no remoulade, no cocktail sauce, no teriyaki, not even really ranch... he liked barbecue sauce!

His tastes have expanded over the years...I'm that wife that makes him try things he has absolutely no desire to try, but he loves me, so he does.  And thankfully, he has discovered a couple of things he can add to his flavor profile (that's me sounding foodie-ish!), but let's be honest...if headed to a deserted island with only one allowed sauce...it would be barbecue!

Guess what?

Every single barbecue sauce in my local market has refined sugars as one of the top ingredients.  ...sigh...  So, I've been practicing!

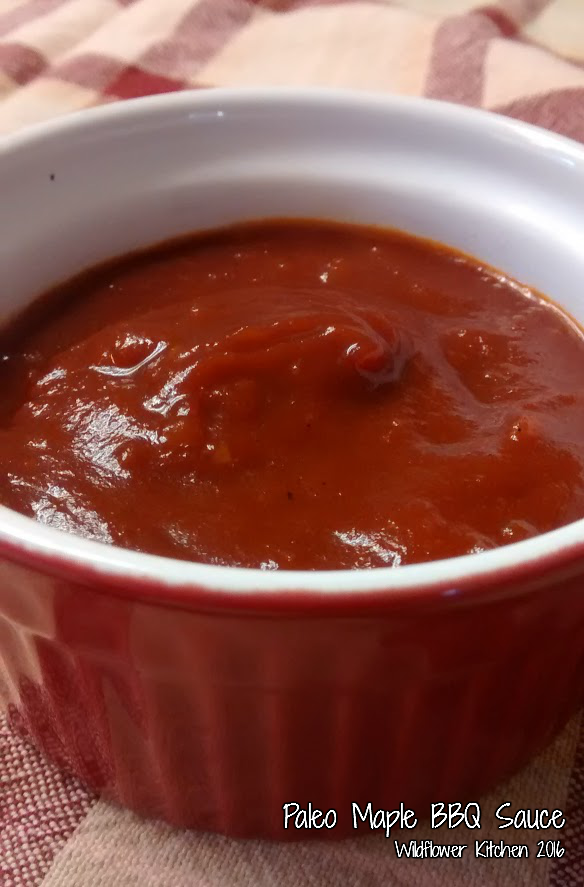
I have tried at least a dozen variations on barbecue - most of them 2 or 3 times trying to get it right.  And I think I've narrowed it down to 3 that we like best of all - a peach barbecue sauce with a few dashes of cholula, a smoky roasted apple barbecue sauce that makes ribs happy, happy, happy and my latest success story - Paleo Maple Barbecue Sauce!


It's my favorite....but I do have a sweet tooth and I grew up on those brown sugar barbecue sauces that my daddy always loved and slathered on chicken and ribs and corn on the cob and hamburgers and turkey legs and sometimes even steaks on the grill!

And, even though it has quite a few ingredients, it's pretty straightforward stovetop cooking, so I wanted to share the recipe with you so you can have a nostalgic, sweet barbecue sauce in your fridge without straying from your Paleo lifestyle.  This is sweetened with Grade B Organic maple syrup and a touch of raw honey.  AND (bonus) - I get to use my immersion blender which always makes me happy!

Here's how you do it...

Ingredients

1/2 cup chopped yellow or sweet onion
1-2 cloves of minced garlic
1 T avocado oil
1 7oz can of organic tomato paste
4 T unfiltered apple cider vinegar
1/2 cup of water
1 T molasses
2 T raw, local honey
1/2 cup of organic grade B maple syrup
1 t sea salt
1/4 t allspice
2 t ground mustard
1/4 t ground cloves (optional)

Heat the avocado oil over medium to medium low heat and sweat the onions until they become soft and translucent, about 7-10 minutes.  Add garlic and cook for an additional 2-3 minutes, being really careful not to brown or burn the garlic.

Add the rest of the ingredients and whisk to combine.  Increase heat to medium high and bring the sauce to just boiling.  Reduce heat immediately to medium low and let simmer, stirring occasionally for 20 minutes.  (It will bubble and splatter, so be careful)  Remove from heat, let cool for 10 minutes and blend with immersion blender until the onions and garlic are smooth and incorporated into the sauce.  Taste for seasoning - add salt or a touch more syrup if needed.  You can also add warm water if you want a thinner sauce - but be sparing - you can't take it out if you add too much!

Store in an air-tight container in your fridge.  Tip:  When you spoon out the sauce - always use a clean spoon.  NEVER use a spoon that has been in other food or on your plate or (heaven forbid) in your mouth!  You will avoid bacteria and contamination, making your sauce last longer without going bad.  Trust me - it's worth washing an extra spoon or two! Also, clean the rim of the jar or container with a clean, damp paper towel before closing it back up.


Friday, February 12, 2016

New To Paleo? Ask Me Anything!

This week has been filled with questions from people I am meeting through people I know.  And that's different than questions from people I know.  People I know - know me!  Know my story.  Know my struggles with weight and although I never really talked about it - probably always knew I had food issues and addiction.

People I meet through people I know probably know me from my Facebook page or an event at school or through my PaleoPlus Meals and Instagram.... I've always been a clean eater to the people I meet through people I know these days.  And that makes answering their questions different.

I don't want to bore them with my story.  I don't want to refer them to this blog at the risk of sounding like one of those over-self-promoters.  I don't want to assume I know why they are interested in Paleo eating.  I can't assume everyone wants to lose weight.  Or is done with achy joint pain.  Or headaches.  Or tummy bloat. 

But I also want to make sure they understand how Paleo has worked for me.  I want them to give serious thought to committing to 30 days of squeaky clean eating.  Giving up ALL the bad stuff - especially the sugars and artificial sweeteners.  I want them to know there is a light at the end of the "I miss bread so much I could die!" tunnel.

So I talk too much - a specialty of mine.  Or I talk too little - a defense against the fear of boring someone.  And then I worry.  I got into my PaleoPlus life and started Wildflower Kitchen because of how drastically it has changed my life and the lives of my family and friends (and a few thousand people I follow on social media!).

I hope they check out My Story on this blog.  I hope they browse around My Paleo Tips for Success and go back to the end of December 2015 and read all the posts I wrote offering some practical suggestions for getting ready to eat clean.  I hope they do their own research and ask me questions and follow up questions and more questions...because I am always happy to answer.

I just don't want to assume they want me to ramble and share and coach.

But I really want to ramble and share and coach.  Did I mention this has been life-changing????  Sorry, but I feel the need to tell a story...

I went to the doctor today - with NO FEAR of scolding!  I didn't worry when they put the blood pressure cuff on.  I didn't have an anxiety attack at the scale.  I am not concerned about my cholesterol or sugar (of course, I've recently had those checked and passed with flying colors!).  I didn't have to pay a valet because my knees and feet hurt too bad to walk a long distance.  I took the stairs - down AND up!  The gown covered my entire body with room to spare!  (for those of you who have never had that experience...you are so lucky.  To sit there and know that you are bigger than the one-size-fits-most hospital gown, trying to pull it around your freezing cold person and being embarrassed and nervous and wanting to cry...sorry - that was me...I was projecting!  See?  I told you - I tend to ramble!)  Anyway - in one short year - my life has changed.  I'm 75 pounds lighter, healthier, happier, pain-free and inspired every day.  And I want to tell everyone!

I want people to DO THIS!   To give it a try.  To ask me questions.  To try new things in the kitchen.  To celebrate all the new flavors and textures they are eating.  To pay attention to the fact that their taste buds are waking up after probably years of being comatose in a sea of sugar and artificial sweeteners and chemicals and preservatives.  (and to fully understand that I am in no way a doctor or dietitian or nutritionist or certified expert of any kind...just a woman with a passion and a pretty awesome success story who loves to teach and share!)

And so, I am guessing I have probably failed this week talking to the people I am meeting through people I know.  But I will continue to try and be the best Paleo/Clean Eating/Real Food/Primal resource I can be and hope I don't talk too much ... or too little ... or ramble ... or over-share - you know what, I can't promise not to over-share...it's in my dna!...but I will be here for the people I know and the people I am meeting through people I know and even people I don't know yet. 

I guess it's true - when something gets a hold of you and lights that fire inside - you have to talk about it - to anyone who will listen.  Because if just a few people listen and try and change and have even a little bit of the experience I have had...I will be satisfied.

Friday, February 5, 2016

Paleo Superbowl? Paleo Buffalo-Style Wings!

Sunday is the "Big Game"...and since none of my family's favorite teams are playing, our get together is more about the food and the commercials this year!  (Let's be honest, I am a die-hard Cleveland Browns fan...every year tends to be about the food and the commercials...sigh...)

Here is my dilemma....we just finished a Clean Eating Kick Start, so having something off-plan is totally within my guidelines.  I mean, I made it an entire 30 days without one stray off the very strict Clean Eating path...I'm hankerin' for a treat of some kind.

Dilemma #2...what should that be?  I really don't spend any time thinking about the foods I "miss".  (and please don't translate that to mean I am some kind of Paleo saint...I spend inordinate amounts of time thinking about all the foods I can have...and will have...and want to try...and want to cook...and want to shop for...and want to enjoy!...I'm still a Foodie all the way down to my toes!)

So, when faced with a chance to have something that doesn't fit our traditional PaleoPlus fare - there really are so many choices.  Pizza?  Always a favorite.  Wings?  No way, I prefer my Paleo version (recipe to follow)!  Beer?  Nope, no headache is worth that.  Chips & Queso?  Maybe...that really is a good one...it's Texas, for goodness sake!  Spinach Dip?  Ooooohhhhh....I like the way that sounds, but I did make a really good Paleo version over the Christmas break, so probably not.

Ice Cream!  That's IT!  I want ice cream.  I'm going to do a Sundae Bar and have Blue Bell Peppermint Ice Cream and maybe something else the kids like...but you know the rules - the gal who shops, chops and cooks gets to decide the menu.  I love my family, but if they don't specifically ask for something, this Super Bowl menu is all mine!

I think it's kind of funny that I when my brain went to the peppermint ice cream (if you live where they sell Blue Bell and you haven't tried the peppermint yet...what are you waiting for?  Get out there!  Get shopping!  Grab a spoon - it's just perfect right when you get home from the store and it's had some time to melt around the edges!...but buy the small one and be thankful that it's a seasonal flavor and not there to tempt you year-round!)

I was always a salty/savory craver.  I never really died for sweets.  I was clearly addicted to sugars and artificial sweeteners, but I craved chips and dips and pretzels.  So many things change when you clean up your diet.  So I expected to decide on a salty indulgence for this year's Super Bowl menu.  Maybe it's because I've figured out how to substitute and make most of the things I love PaleoPlus friendly.  And I can't make this ice cream.  Don't get me wrong - I have an ice cream maker...but I don't like to make ice cream.  It's expensive.  It's time-consuming.  It takes up very valuable real estate in my freezer.  And it's not as free-form and immediate as cooking in a saute pan.  So, Blue Bell ice cream it is!

The rest of the menu will be Paleo.  Wings Two Ways - Teriyaki and Buffalo.  Veggie Tray with Paleo Dump Ranch.  Plantain Chips and Sweet Potato Chips with Guacamole.  And perhaps this Dark Chocolate-covered Paleo Bacon I saw on Pinterest...depends on my time-management, I guess!

And the Sundae Bar - my kids asked for sprinkles, gluten-free chocolate cookie crumbles, whipped cream out of the can (don't judge us - we love that crap!) and homemade paleo chocolate sauce.  Done!

I wish I could tell you I had a super-secret recipe for my wings that would make it worthy of being in a best-selling cookbook - but it's pretty standard stuff.  I will share it with you, because I think the reason people pay for wings is that they don't realize how simple it is to make them at home.  The secret is in this 2-step cooking method.  (I want to say I saw it on a Guy Fieri cooking show on Food Network many moons ago...I love him!, but I'm not positive.)  Whatever brilliant chef shared this - thank you!  It has made it possible for my family to enjoy platter after platter of wings without having to pay the crazy-high prices or endure the deep-fried tummy ache that ultimately follows.

So, here's how I do it!

Ingredients:

To roast the wings (do this step the day before) - 
5 pounds of chicken wings (if you're cutting your own - don't throw away the tip - use it to make bone broth or stock!)
Avocado Oil
Salt and Pepper

Buffalo Sauce - 
1/3 cup Frank's Red Hot (or other compliant hot sauce)
1/3 cup Ghee (or coconut oil or grassfed butter)
1 T garlic powder
1 T paprika
Juice of one large lemon
2 T apple cider vinegar
Salt and pepper

To start the wings:
Preheat oven to 400°
Drizzle avocado oil over the wings to coat - you can do this on the sheet pans or in a large bowl prior to placing them on the baking sheets.  Place wings in a single layer on baking sheets covered in parchment paper or Silpat liners.  Roast for 20 minutes.  Remove from oven, flip the wings over and roast for an additional 20 minutes or until the wings are nearly cooked through and the skin is starting to turn golden brown.  (You will finish these wings on the grill, so be careful to not overcook them).
Let the wings cool, place in zipper bags or covered containers and put in the refrigerator overnight. Something about this step of cooking, cooling and grilling makes the meat come right off the bone when you are chowing down on these babies!

To finish the wings:
Get the wings out of the fridge and allow to come to room temperature (about 30 minutes before you want to start your grill).
While they are warming up, prepare your Buffalo Sauce.  Melt the Ghee in a sauce pan over medium heat.  Add the remaining ingredients, whisking to combine.  Simmer for 5-10 minutes and remove from heat.  (You may be tempted to bend over and take a big whiff of this delightful sauce as it's cooking - but DON'T!  It will make your eyes water and your nose burn from the peppers.  Hot sauce must be respected!)
Preheat your grill to 375° (ish).  Give the wings a stir to make sure they are still covered with a hint of avocado oil.  If they seem dry - brush your grill with oil so they don't stick and pull off all that crispy skin.  Once the grill is hot, place your wings on the grate and grill until you reach the desired crispiness and grill marks (about 5-6 minutes per side).  Remove from the grill and place in a large metal bowl (or any bowl large enough to hold all your wings).
Pour the prepared Buffalo Sauce over the wings and toss to coat.  Serve warm with veggie sticks and your favorite Paleo Ranch dip.

I hope you enjoy these wings as much as we do.  It's a few steps, but they are so ridiculously good!  We'll have half in this sauce and the other half in my favorite Paleo Teriyaki Sauce - from Russ Crandall/The Domestic Man's Paleo Takeout cookbook - a good investment for anyone searching for a Paleo cookbook - so far - every single recipe - delightful!  Go Peyton!  Go Cam!  Go Broncos!  Go Panthers!  Go WINGS!

Wednesday, February 3, 2016

Hearty Chicken Vegetable Soup - Paleo and Slow Cooker Style

Cooking is easy...recipe writing is a giant pain in my backside!

First of all - I am rarely satisfied and have no idea how to cook a little bit of anything.  So...when I decided I needed a hearty Paleo Chicken Soup recipe - I made a big ole pot.  We had it for dinner.  I had it the next day for lunch.  It was good.

But it wasn't great.  AND, I wanted a soup I could make in my slow cooker.  Of course that meant another giant pot and a few more splatters on the paper I was trying to capture the recipe on and soup for lunch and dinner once again...This version was better.  Really good.

But not "creamy"...which, in a world devoid of dairy and gluten, can be a challenge.  Just because our bodies can't tolerate dairy and gluten doesn't mean our bodies don't crave rich, creamy soups.

Enter my produce Super Hero - Cauliflower!

Cauliflower stands in beautifully for rice, for popcorn, for mashed potatoes, for all starchy cravings.  And, in the hands of this owner of a brand-new Christmas immersion blender- turns really good Chicken Soup into totally satisfying, hearty, CREAMY Chicken Vegetable Soup!  Dun-da-Dah (sing that like a superhero entrance jingle, please!).

   
version #3 notes

 This required another huge batch of soup (split into 2 crock pots for some spice variations), more splatters, another sheet of paper, more notes, tasting, seasoning and more soup for dinner for the whole family and lunch for me...and lunch again!  Did I mention it was totally satisfying?  Hearty?  Creamy?  Yeah, I can eat more of that for dinner (and lunch)!!!

I have to admit, this isn't your classic "dump it all into the crock pot and walk away" easy recipe, but it's February, it's cold outside, it's cold and flu season and it's an American classic (Paleo-style) for goodness sake!  All that to say - it's worth the extra pot to wash and extra steps.  Extra bonus - it freezes well.  I just had the serving that I popped in the freezer...good stuff!  (this is a BIG recipe - it makes just over a gallon of soup (all the way to the top of my big slow cooker) - but if you're going to cook - make extra and freeze some for later)

Here's how it worked the third time around (third time's the charm, my mother used to say):

Ingredients:

1 1/2 T coconut oil or ghee
3 large boneless, skinless chicken breasts
3 stalks celery, sliced
5-6 carrots, sliced
1 red bell pepper, large dice
1/2 head of cauliflower, chopped
4 cloves of garlic, chopped
1 yellow onion, diced
1 large sweet potato, peeled and cubed (1")
3 bay leaves
2 t dried oregano
1 t turmeric
1-2 t Herbs de Provence
Salt and pepper
Squeeze of lemon juice
3 c chicken bone broth or gluten-free, sugar-free, organic chicken stock
1 c water
1/2 c full fat coconut milk

1.  In the bottom of a dutch oven, melt the coconut oil over medium heat.  Saute the onions until they become translucent.  Add the spices (except for the bay leaves) and garlic and stir to combine.
2.  Add the chicken bone broth or stock and stir to combine. 

You can freeze half for later*
3.  Add the chopped cauliflower to the bot and bring it to a boil.
4.  Reduce the heat and simmer for 15 minutes or until the cauliflower is fork-tender and turn off the heat.
5.  Using an immersion blender, "buzz" the mixture until it is smooth and silky.
6.  Taste for seasoning and add salt and pepper as needed.
7.  Add a squeeze of lemon juice and stir in the coconut milk
8.  Ladle enough of the cauliflower mixture to cover the bottom of your slow cooker.
9.  Lay the chicken breasts on the bottom of the slow cooker crock
10.  Add the chopped celery, bell pepper, sweet potatoes, carrots and bay leaves.
11.  Pour the remaining cauliflower mixture over the top, stirring to combine and cover.  (You may need to add more bone broth, stock or water at this point to get your soup to the consistency you prefer.)
12.  Cook on low for 6 hours (this really depends on how big your carrot slices are and how thick the chicken breast are) the carrots (all the vegetables, really) should be fork-tender and the chicken breasts need to register 160° on an instant read thermometer.
13.  Remove the chicken breasts and shred them with 2 forks, leaving some bigger pieces for that homemade, hearty texture.
14.  Place the shredded chicken back into the slow cooker, stir, taste for seasoning, cover and let cook for an additional 30 minutes to an hour on low.

The blended cauliflower and coconut milk turn this basic chicken and veggie soup into a rich, creamy "stoup"...you know, a cross between a stew and a soup?! 

By the way - if you don't own an immersion blender, place the cauliflower mixture (at step #5) in small batches into a blender.  Remember - hot liquid and a blender can be explosive.  Never fill your blender more than 1/3 to 1/2 full and use a kitchen towel you don't love to place over the lid and then hold that sucker down!  It's a kitchen Catch 22 - things blend better when they are warm, but warm liquids in a closed container really want to expand when you turn the blender on.  Just watch a You Tube video or a Food Network tutorial or ask your kitchen role-model and trust me - be careful, don't overfill, use the towel, hold the lid, be patient and you'll have a perfectly-blended cauliflower base for your soup in no time!

*I totally forgot to take a picture of the final version in a beautiful bowl...it was really good and we ate it!  Talk about the perks of recipe development!