Sunday, November 22, 2015

Drumsticks 3 Ways

The older my kids get, the crazier our schedules become.  Especially in the evenings! 

I grew up eating dinner on the fly.  We did not have the luxury of sitting down as a family (even though there were only the 3 of us).  I grew up in a motel that my family owned and our "house" was the middle building.  And we had 2 front doors...one that led into our living room and one that opened up to the lobby.  The living room front door was rarely used and the lobby front door was open to the public 17 hours a day.

We were a small motel - just 32 units, so we didn't need to hire a full staff to work the desk.  We had Angie and Mom and Me.  Daddy was really more effective sitting in the lobby with the guests and running for donuts and fixing things around the place...he wasn't quite detail-oriented enough to fuss with day-to-day operations (at least not for my borderline ocd mom - and yes, I get that from her!)

Anyway, we were able to go back into the "house" if no one was in the lobby, but as soon as someone walked in, the doorbell went off - it was loud!  And the hours between 5:30-9:30pm were probably our busiest hours for new guest check in and current guest mail/towel/change/candy/message pick-up.  Which means - that doorbell went off quite a bit during traditional dinnertime.

So, if mom decided to cook a sit-down meal for us, we were just asking for an interruption.  And Daddy, who was the most easy-going person I've ever known, would lose his cool.  His face would scrunch and he would throw down his fork and stomp from the table to the lobby...mom and I chasing after him so he didn't use all that frustration to scare a perfectly innocent, potentially cash-paying guest away.  (Daddy was 6'4", so if you didn't know he was a teddy bear - it could be intimidating, I suppose!)

My point in rambling on about my dysfunctional childhood dinners - I have always made sure that we sat down as a family to eat AT the dinner table.  It's always been a priority.  Until recently.  I do the best I can, but I am not going to create stress in my life because I have teenagers who are fortunate enough to be involved in a lot of activities...that is, beyond the stress of just HAVING teenagers!  So, I am on a mission to create meals that are easy and delicious to eat if you happen to be home at dinnertime or if you happen to get home an hour later or if you need to reheat something even later than that.

Which brings me to my latest experiment - Drumsticks 3 Ways.

I bought a huge pack of drumsticks, so I decided to try and "PaleoPlus" 3 different marinades from Pinterest and see what worked the best.  Surprisingly - I loved them ALL! 

lots of pans, 3 ways of cooking, saucing and finishing...#funinthekitchen PLUS side dishes!
I also tried 3 different cooking methods - from roasting off one batch ahead of marinating or saucing, roasting one on a sheet pan while boiling the marinade for a sauce, and baking one IN the sauce.  I finished 2 of the recipes on the grill and finished the one I baked in the sauce under the broiler.  I liked that one the best...so that is the cooking method I will share with you today.  You can prepare them any way you like - the marinades are the secret - BUT, since these are bone-in, skin-on drumsticks - the finish under the broiler or on the grill is key to crispy skin - the ONLY kind of drumstick I will be eating!

Here are the different marinades I modified PaleoPlus:  These recipes make enough to marinate up to 4 pounds of drumsticks if you don't want to have extra for a dipping sauce - remember if you marinate raw chicken IN the sauce you MUST bring it to boil before using it as a sauce or dip.  I bring it to a rolling boil and then simmer for 10-15 minutes, stirring occasionally, to make sure any harmful bacteria is destroyed.  Also, if you are taste testing your marinades - do it BEFORE it touches the raw drumsticks!


Honey Hot Drumsticks


2 T unfiltered apple cider vinegar
2 T raw, unfiltered, local honey
1 T compliant hot sauce (I used Franks)
1/4 c coconut sugar
1 T organic, grade B maple syrup
1/4 c coconut aminos
2 T minced garlic
1 t red pepper flake
sliced scallion for garnish (optional)

Mix all ingredients (except scallion) in a bowl and whisk to combine, pour over chicken in a covered dish or zipper bag and marinate at least 1 hour or overnight.


Citrus Herb Drumsticks

2 c fresh squeezed orange juice
1 T fresh lime juice
1 T fish sauce
1 T organic, grade B maple syrup
3 sprigs fresh thyme
3 sprigs fresh parsley
1/4 jalapeno, ribs and seeds removed, sliced
1 t sea salt
1 t freshly cracked black pepper

Mix all ingredients in a bowl and whisk to combine.  Pour over drumsticks in a covered dish or zipper bag and marinate at least 1 hour or overnight.

Garlic Ginger Drumsticks

6-8 cloves of garlic, crushed or chopped
1" piece of fresh ginger, chopped
1/2 c of fresh parsley
1/3 c of coconut aminos
1/3 c of avocado oil (or compliant oil of choice)
1 t sea salt
1 t freshly ground black pepper

Place all ingredients into a blender or food processor and pulse until the mixture become a loose paste (you can add more avocado oil if needed).  Pour over drumsticks in a zipper bag and marinate at least 1 hour or overnight.


To prepare the drumsticks, remove them from the refrigerator 20 minutes before cooking to begin bringing them to room temperature before they go in the oven.  BE CAREFUL - this is raw poultry - you don't want to leave them on your counter, unrefrigerated for too long.  Preheat the oven to 375°.

Line a casserole baking dish with heavy-duty foil (for easy clean up).  Place the drumsticks in the dish and pour the marinade over the top [reserving any marinade you want to boil separately for a finishing or dipping sauce] tossing to make sure the drumsticks are well-coated.  Bake for 45 minutes, turning the chicken once after 30 minutes (the top should be browned before turning) until the chicken is cooked through (165° internal temperature).  Finish the chicken under the broiler to crisp the skin.  I broiled mine on high for 10-12 minutes (but my broiler is wimpy!) You can also finish these on a screaming hot grill.

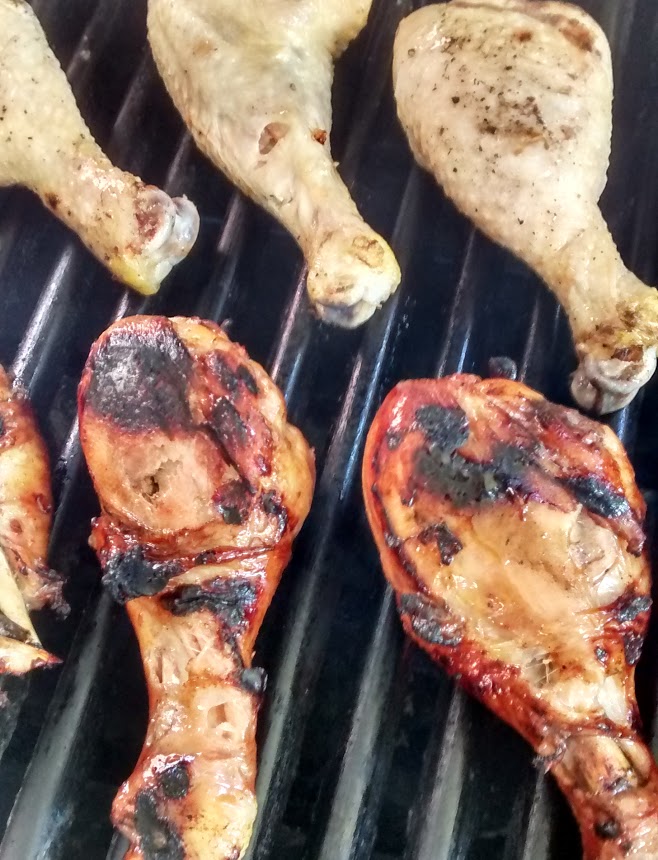
finishing on the grill
We did a family taste test and they all came out as winners...my husband wanted a bit more spice, my son liked the ones with less char and my daughter wished they were chicken tenders instead of drumsticks.  I think I like the Garlic Ginger the very best (which surprised me), but will continue to make all of these!
from L to R - Garlic Ginger, Honey Hot, Citrus Herb

I served mine with oven-baked fries and steamed broccoli tossed in melted ghee infused with garlic and sea salt.  The best part is...They were great right out of the oven, an hour later and this morning, reheated in foil at 350° for 12 minutes.  Enjoy!


Saturday, November 21, 2015

Can We Really Change the World???

 Today I had an awesome opportunity to talk about the way PaleoPlus eating has changed my life for the better.  For the SO MUCH BETTER!  And every time I tell my story I get more convinced that everyone owes it to themselves to try this lifestyle.

What would you do to feel better?

Would you take a pill?  If your insurance covered part of the cost, most of us would say "Of course!"

Would you join a gym or a boot camp or a pool and work out every day?  Maybe.

Would you count calories or measure your food in little plastic boxes or buy frozen "Lean" meals and eat them...most of us have at some time.

Would you go under the knife and have a pretty extreme surgery designed to help you eat less?  Notice how I said "help" you eat less, not "make" you eat less.  How many people do you know who've had the surgery and found a way around the procedure to put the weight back on and now suffer from complications way worse than being overweight?

Would you pay high registration fees to eat boxed, preservative-filled meals and 'snacks' that are made edible with high amounts of artificial sweeteners?  Or drink your meals?  Or buy a "cleanse"?  Or buy the "magic weight loss" powder or pill or capsule or supplement...even though you know it's probably too good to be true, but you'd do anything, right????

Would you eliminate inflammatory food groups from your diet - knowing there are some pretty fine substitutes out there so you wouldn't have to feel deprived?  Would you give up gluten, grains, legumes, dairy and refined sugars and artificial sweeteners to look and feel better?

ARE YOU KIDDING ME???  I COULD NEVER....I WOULD MISS ________ (you fill in the blank) TOO MUCH!

For the most part - that's the initial reaction to eating PaleoPlus.  It certainly was mine!

I thought I would die without my favorite diet soda - I drank 2 or 3 20oz bottles every day for probably 30 years.  And bread - I couldn't live without bread.  I ate some form of white or wheat flour bread or snack at least 3 times a day.  Oh yeah - and cheese...I worshiped at the shrine of a great cheese counter.  I had all the excuses and all the reasons WHY NOT. 

But I did it.  And I keep doing it.  And I am reaping the benefits every day.

I wish I could tell you why I care so much that others experience this - I know that I test empathic off-the-charts in personality tests...so maybe that's it.

More likely, it's because I can feel (and have felt) exactly what others who are struggling with an overall blah-ness in their health are feeling.  And I've spent years of trying really hard to lose weight through calorie-restriction and exercise and I failed.  Over and over and over.  Until this.  And now I want tell everyone that this might change their lives the way my family and many of my friends have changed theirs.

Our weight loss has been phenomenal.  But beyond that - we all are sleeping better, my kids are performing at a higher level in sports, we've got great skin, great hair & nails, way more energy, better mood, better concentration and for me - no more bloat, no more achy feet and hips and back, no more sinus pressure or migraines.  And I can shop in the "regular" departments!  It's been life-changing!

So I take every opportunity I can get to tell people about PaleoPlus and I will explain and encourage and cheer from the sidelines every victory and every milestone.

Can I change the world?  Maybe not.  But if I can change my life, who says I can't help others change theirs?  Maybe not the first time I talk to them.  But maybe the second...or third...or twentieth.  It's that important!

What's your passion?  What is that you can't stop talking about?  How do you change the world every day?  


Thursday, November 19, 2015

Apple Pork & Beef Meatloaf


Yesterday's kitchen experiment was a success!  The meatloaf I made with ground pork, ground beef, grated apples and onions and spices was so flavorful and a perfectly dense, but not heavy, consistency.

I've always enjoyed the combination of pork and apples.  Thick-cut, bone-in chops with cinnamon apples have been a Sunday Dinner staple at my house since before we had kids.  I admit, I wasn't sure what adding grated apples into the meat might do to the texture or the apple's flavor - but it I loved how it turned out.  I thought of it like soaking the white bread in milk to moisten a meatloaf....did any of you do that?  Someone in my family did...was it my mom?  I can't remember!

I did grate the apples onto a cutting board and didn't add all the juice that was released.  I just used the grated apple flesh.  And I chose to grate the onions too - more for consistency and because my son can do without big chunks of onion in anything!

This really was a perfect fall recipe.  Great flavor, warm spices and easy preparation for busy school nights or weekly meal prep (I snuck a slice off the end and popped it in my freezer to see how it would reheat - I am happy to say, it was great for my breakfast this morning!!! - thawed AND reheated in my microwave!)

Here's how it all came together:

1 1/2 pounds of ground pork
1 pound of ground beef
1 large apple (I used Honeycrisp), grated
1 small to medium onion, grated
1 cage-free, organic egg
1 1/2 T of chili powder
1 t cayenne
2 t ground cinnamon
2 t ground mustard
1/2 t fresh nutmeg
2 t sea salt
Fresh ground black pepper

Preheat your oven to 350°.  Line a loaf pan with parchment paper and cover a small baking sheet with foil (this is just a precaution and not 100% necessary...but I'm all about easy clean up!) 
Combine the ground pork and beef into a large bowl.  Grate the apple and onion and add to the meat mixture.  Add the egg and spices and mix to combine thoroughly (impeccably clean hands work best!).  At this point, I make a test bite and cook it in a non-stick pan so I can adjust seasonings if necessary.

Pour this mixture into your prepared loaf pan and pat down (don't smash it down, just a light touch to even the top).

Place the loaf pan onto the baking sheet and place in the center rack of your preheated oven.
Bake for 1 hour (or until the loaf registers at 160°).  Remove meatloaf from the pan and place directly onto the lined baking sheet and place under the broiler for 3-5 minutes to brown and crisp the top.
Serve warm or right out of the refrigerator.  You can also freeze individual slices in freezer bags for easy weeknight meals.

Wednesday, November 18, 2015

"Brady Bunch" Meatloaf

Don't judge me...I love meatloaf

I mean I LOVE meatloaf.  Since early childhood.  Right out of the oven, right out of the fridge, in a sandwich, on a plate...in a boat, with a goat, in the rain, on a train....oops, sorry!  Went all Dr. Seuss on you there!

My point is - I love meatloaf.  My son loves meatloaf (he is his mother's son, after all).  My daughter thinks it's gross and my husband is smart enough to pretend he loves MY meatloaf!  And so, today when I knew I had a couple of hours to play with a recipe and a couple of pounds of ground pork and beef that needed to be cooked - my hands instinctively reached for my mom's meatloaf pan!

As some of you know - I am a Paleo cook on a tight budget.  So, when something is ON SALE (not just on sale, but ON SALE!), I buy it and find a way to make it work in my weekly meal prep and cooking.  Which brings me to the apples and onions filling my pantry basket and crisper drawer.

See where I'm going????

"Pork Chops and Applesauce...."  If you are of a certain age - you can almost hear Peter Brady saying this to Alice and his mom and dad in 1971 (or more recently on Hulu or YouTube), trying to channel Humphrey Bogart on The Brady Bunch.  Classic sit-com from my childhood.  Classic dish from the same time period...Brady Bunch Meatloaf!!!


I've been making meatloaf for 30 years, so I've got the basics down.  Not that I've ever put apples in a meatloaf...but they were 68 cents a pound and I found all the best-looking ones in the bin!  So, I mixed the ground pork and ground beef.


Grated an apple, grated an onion and added some spices of the hot variety (chili powder, red pepper flake, mustard powder) and of the sweeter variety (cinnamon, nutmeg), a bit of minced garlic and one perfect cage-free, organic egg.

If my test bite* is any indication...this is going to be one great meatloaf that may never make it to the leftover stage for sandwiches...I think it's going to be devoured in one sitting!


Whenever I am cooking proteins - especially ground proteins - I always cook up a "test bite" so I can adjust the seasoning or whatever needs adjusted BEFORE I cook up an entire batch of burgers or meatloaf or meatballs or taco meat.  I refuse to waste my time and money - and I really like knowing ahead of time that what I am serving will taste great! (Thanks Anne Burrell - my favorite food tv chef - for teaching me this over and over!)


I have some Brussels Sprouts and a few more of those super-sale apples to whip up some homey side dishes...suddenly, I am much more excited about dinnertime than I was when I peered into my fridge earlier this morning!

Do you experiment in the kitchen?  The best way to become fearless is to pull things out of your fridge, your pantry, your spice rack that you know pair well and then cook them together - in a slow-cooker or a dutch oven or in the biggest of the non-stick pans or a casserole dish or your mom's old meatloaf pan!  Taste and season as you go along.  Make that test bite* and adjust accordingly.  Use what you have to modify something you already know how to make - it still lets you be adventurous in your kitchen...but with a sort of recipe safety net!

When I made the full switch to PaleoPlus eating - I didn't want to give up all the foods my family loved - so I modified.  I experimented.  I failed a few times (but never such a huge fail that we went hungry) and my Paleo substitution skills are getting stronger every day thanks to all the experimenting!

I wish you all #funinthekitchen and as always, a celebration of real food through PaleoPlus eating!

Saturday, November 14, 2015

PaleoPlus Ranch Dip (and hot wings)

Like a lot of families who work in the food industry - we don't have a "regular" schedule.  My husband and I both work weekends (even though I am working from home) and evenings.  And our kiddos are teenagers involved in sports and activities and school, which makes it tough to find time for all of us to sit down for dinner at the same time.

I tend to make meals that can be easily reheated so whoever happens to be home when I'm cooking - eats together.  Everyone else still gets fed a healthy, PaleoPlus meal, they just have to heat it up and do their own dishes!

This weekend is my husband's weekend off - very exciting!  Of course we have plans that have nothing to do with eating - BUT - one of his requests is to sit down and watch the Buckeyes play today.  At lunchtime.  All of us.  And that means wings!

 We love wings, but obviously we no longer get the deep-fried, sugar- and preservative-laden wings from any number of places within 5 minutes of our house.  We make our own.

If I had a real recipe, I'd share it...some day I will write down what I'm doing, I promise!  But I can tell you that my wings take 2-3 days to prepare.  Once they are cut, I roast them in avocado oil on sheet pans to cook them just through.  Then I cool them, add spices and bit of melted ghee and put them in zipper bags in the refrigerator overnight (at least).  Then I bring them back to room temperature and grill them over a very hot grill until they are crisp.  Then I toss them in whatever Paleo-compliant sauce I whip up. (When I first tried to make them, I looked up "Buffalo Wing Sauce Recipe" and just substituted compliant ingredients and tasted as I went along until it was right!)

And I like them ten times better than carry-out wings.  Roasting them ahead of time makes the meat fall right off the bone and you never get that creepy not-quite-done bite...which can turn me off wings for a month or more!

So, even though we don't get carry out - I do want the experience to be similar to carry out. 

I like the celery and carrot sticks and we like Ranch for dunking.  I don't want to pretend that my PaleoPlus Ranch Dip tastes just like the ranch we are used to getting in restaurants.  I couldn't duplicate that taste BEFORE I switched to clean eating!  BUT, I love it with the veggie sticks and the way it cools down the spicy buffalo wings.

PaleoPlus Ranch Dip and veggies
I like the texture too.  I have always been more of a blue-cheese-with-wings girl - but with my dairy intolerance - I'm not about to go there.  So, I like the texture I get when I hand-mix cold Whole30 Mayo and coconut cream (here in DFW, Sprout's and Trader Joe's have the best prices) to make the dip...it stays a little bit chunky and gives me that blue-cheesy look and feel without the fever-like symptoms that come with the real thing (for me, at least)!  I'm assuming if you use a hand mixer instead of a whisk, you'll get a smoother consistency.

I think the base is the important thing to know - you can add any spices you like.  We use a version of this dip for crudités, on chicken or fish, with a dash of hot sauce to dip sweet potato fries in and of course, every time we make hot wings.


Here's how I make mine - feel free to be creative when making your own!

1 cup Whole30 mayo - cold
3/4 cups cold coconut cream (here's how to make it if you can't find the canned coconut cream)
2 garlic cloves, grated
2 T onion, grated
3 T fresh parsley, chopped
1 T fresh dill (or 1 1/2 t. dried dill)
1 T fresh lemon juice
1 t sea salt

Whisk together the mayo and coconut cream in a large chilled bowl.  Grate the garlic and onion into the mixture.  Add the remaining ingredients and whisk until combined.  Refrigerate for at least 2 hours to let the flavors combine, before serving. 

I started these wings on Thursday, made the sauce and Ranch Dip yesterday morning, pulled them out of the fridge to come to room temperature and can't wait for lunch!!! 


Thursday, November 12, 2015

Perfectly Roasted Sweet Potatoes

For the first 50 years of my life, sweet potatoes came out of a can, drenched in a sugary syrup and were served on Thanksgiving, Christmas and Easter topped with an entire bag of marshmallows.  I have exactly NO memories of my mother buying a fresh sweet potato at the store or cooking one in our kitchen.

My sweet potato game has come a LONG WAY since switching to a PaleoPlus lifestyle!

I buy 10 pounds of sweet potatoes every week.  And sometimes we run out and have to make another run...because we LOVE them.  I put them in soups and chili.  I bake them and stuff them and whip them and spiralize them.  I make oven-baked sweet potato fries at least once a week and I roast them with a host of other root veggies as part of my weekly meal prep.  (I adore root vegetable hash with fried eggs for an easy supper and if you roast the veggies ahead of time, you save yourself an hour on a busy weeknight or hectic morning!)

But our go-to sweet potato preparation is oven-roasted cubed potatoes.  Everyone likes them and they go with almost any meal.

Truthfully, any old form of roasted sweet potato is good.  But I feel like I've got this down to a science, so I'm going to give you my step-by-step method for roasting a perfect sweet potato!

And, for what it's worth - Sprout's Market (in North Fort Worth, at least) seems to always stock high quality sweet potatoes at a good price (usually around $1 a pound) 

Step 1:

Scrub, dry and peel the potatoes (we do 3 average-size potatoes for our family of 4, but if I want some extras for breakfast or lunch the next day, I do more...remember, if you're turning on your oven anyway - FILL IT UP!)
Step 2:

Chop your potatoes into cubes.  I like 1" cubes if I have plenty of time to prep and roast them - this size takes just over an hour in my oven, but if I have less time, I cut them into smaller chunks and then adjust my cooking time.
Step 3:

Don't skip this step and try and do it all on the sheet pan to save washing a bowl (I say this from experience!).  Put all the cubes into a large bowl and toss with melted coconut oil - 2 T for 3 potatoes.  Then sprinkle with 1 T of your favorite seasonings...I use a spice mix I make that has cumin, smoked paprika, turmeric, cayenne, onion & garlic powder and sea salt.  You can also use a bit of cinnamon to make them more traditional.  I also like rosemary or thyme with garlic powder, sea salt and red pepper flake.  Play around with whatever you have and whatever you like.  Sweet potatoes play really well with lots of flavors.
Step 4:

Place the seasoned potato cubes on a parchment-lined baking sheet and roast at 400° for 25 minutes on the middle rack in your oven.  Remove the sheet pan, stir the cubes and put back in the oven for an additional 25 minutes.  (Know your oven...25 minutes in my oven, may be 30 in yours...or 20 - just pay attention the first time you're following any recipe.)

Step 5:

Once the potatoes are cooked through and starting to brown, remove them from the oven, do a final stir and turn with a spatula and drizzle with organic extra virgin olive oil or avocado oil and toss.  Add another sprinkling of sea salt (optional) and put back in the oven on the bottom rack for 10-15 minutes, until the edges are perfectly browned - you decide how much color you like on your potatoes (if you're planning on using some for pan-fried hash - remove them BEFORE this step or they will be too browned to brown again in a pan and will taste bitter in your breakfast hash.)
Step 6:

Enjoy!  These potatoes go with almost every protein.  Last night I make my classic "Empty The Fridge" dinner for my son and I.  I had a few mushrooms, a half an onion, 2 chicken/red pepper sausages, a chicken breast and a handful of green beans and they were all taking up valuable room on my refrigerator shelves - so I cooked them all and added these potatoes as the crowning touch.  YUM!


Saturday, November 7, 2015

It's the Little Things...

It's nearing the end of Day 6 of the first ever CleanLeanMean15 - a pre-holiday clean eating program to introduce people to a PaleoPlus diet.  I am doing it with the group and can't believe the difference cutting sugar totally out of my diet again has made!

I have maintained a pretty strict PaleoPlus diet.  I am not tempted, I don't follow the "one bite rule", and I keep my fridge and pantry CLEAN!  We have, however, started using some low-glycemic sugars in recipes and coconut sugar in my morning coffee. 

The problem was - I started just using the coconut sugar on Sundays...and then it was Saturdays and Sundays... and before I knew it - it was EVERY morning.  I have a sweet tooth.

Thankfully, switching to a Paleo diet has been about so much more than the 63 pounds I have lost - so recognizing the danger of sugar (even the Paleo kinds) was easy for me.  Paleo eating has improved the quality of my sleep, my joints don't ache anymore, I don't suffer migraines or sinus headaches and my jeans fit the same at the end of the day as they did when I put them on in the morning.

I had no idea how often I was bloated and puffy and uncomfortable thanks to my old way of eating.

So, although I am never going to be on the cover of the SI swimsuit issue, I don't care.  I have experienced a hundred little victories by honoring my body with wholesome, real food instead of a bunch of preservative-laden, sugar-filled junk.


And those are the kind of victories that make me push to find a way to change the lives of anyone who will listen and give this a try!

Yesterday, a dear friend said "I have ankles at the END of the day!" and her face lit up!

Another friend sent me a text about this helping her find strength she had forgotten she had...how empowering is that?!

I keep hearing people talk about conversations with people who don't know about their journey who  tell them how good they look or about how great their hair looks or stories of feeling truly hungry for the first time in forever.

And the comments about increased energy!  I'm almost used to it now, but in the beginning, I was amazed that I never felt the mid-afternoon "slump" anymore.  What a blessing!

It can't be just about losing weight or being on the cover of Sports Illustrated.  Even if that's the deciding factor to get you to TRY Paleo.  It's the other little victories that cause people to effortlessly make the switch to a Paleo lifestyle...forever!

It's all the little things that add up to these amazing, giant, big things like health and energy and pride and vitality!  I love it!

Friday, November 6, 2015

Weekend Meal Prep

It's Friday evening...and at my house, that means we are all eating something different because we are cleaning out the fridge.  My routine is crazy-organized grocery shopping on Saturday (I go really early to avoid a crowd) and then I cook, chop, crock-pot and bake like a mad woman on Sunday so we are ready for the week ahead.

I'm a pretty good planner, but with teenagers in the house - you can never be 100% sure who is going to be home to eat what meal.  So, by Friday night, I have a little bit of this and a little bit of that...so, that's what we have for dinner.  I get it all out and reheat or stir fry or whatever and it goes up for grabs!

And then I make my grocery list (and clean a LOT of plastic containers!!!)

If you are new to meal-prepping and short on time or energy or even interest.  I want to share a very basic list to get you through your week.  I am making the list for an individual - just double or triple or quadruple it based on the number of people in your family.  This list assumes you will be preparing and eating 3 meals + one snack every day.


 Here's what I ALWAYS buy:
  • Red and orange bell peppers
  • Yellow sweet onion
  • Garlic
  • Sliced mushrooms
  • 2 Tomatoes
  • 3 limes
  • 3 lemons
  • Avocado (3 or 4 if you're doing anything spicy or Mexican or just love avocado!)
  • Red grapes (check your sale flyers...these go on super-sale most weeks somewhere!)
  • 2-3 pears
  • 2-3 Honeycrisp apples (choose your favorite...that's mine!!)
  • Cuties if they are in season...great in spinach salads, sparkling water or as a snack
  • Baby carrots
  • Celery
  • 2 heads of cauliflower
  • Salad mix or your favorite lettuces to chop up (baby spinach, romaine hearts, herb mix)
  • Butter lettuce or iceberg if you may do lettuce wraps or lettuce "buns" for your burgers
  • Parsnips
  • 2-3 Russet potatoes (5 pounds will last you the entire month...maybe more)
  • Spaghetti squash
  • 18 cage-free or organic eggs
  • Compliant bacon (nitrate and sugar free) (Sprout's, Whole Foods, Central Market)
  • Boneless, skinless chicken breasts
  • 1 pound 85/15 ground turkey
  • 1 pound 80/20 or 90/10 ground beef
  •  Almond butter
  • Raw slivered almonds
  • Plantain chips (In the bulk bins at Sprout's, in the chip section at Trader Joe's)
  • Unsweetened almond or cashew milk (check your labels!)
  • 1 bag of frozen green beans 
  • 1 bag of frozen stir fry veggies
  • 1 jar of sugar free marinara - Aldi has a tomato basil organic, sprout's has a sugar free tomato basil, Winco foods has one too...but I can't remember the specifics...read your labels!
  • Coconut oil
Obviously, there are other things I may need to buy if I've run out, but these are the things that are virtually always in my weekly shopping cart.

Once I've put away the groceries - I start cooking.  I break it up into 2 days usually.  I do the snack bags right away - why put the stuff away and then get it back out to divide into baggies!?  I usually dice the onions, red peppers and garlic and put it in plastic containers.  Then I chop the sweet potatoes into fries and cubes and put them in gallon zipper bags.  If I'm making (and not buying) salad mix, I usually only chop half of what I buy since it can go bad quickly.  (Tip:  place a paper towel at the bottom of your container or zipper bag, put your lettuce mix in and top with another paper towel...this will keep your lettuce fresher longer.)


Here's what I ALWAYS make:
  • 9X9 breakfast casserole with meat and veggies
  • 3 poached chicken breasts 
  • 1 pound ground turkey (Asian-style, taco-meat-style, breakfast-style)
  • 1 pound ground beef or pork or combo meatballs OR patties (for burgers)
  • 1 roasted spaghetti squash
  • 1 pan of cauliflower rice
  • 1 recipe of root vegetable mash OR 2 baked sweet potatoes for sweet potato mash
  • 3 pounds of chopped sweet potatoes (I usually do half "fries" and half cubes)
  • 1 diced onion
  • 1 diced and 1 julienned red pepper
  • 1 gallon bag of salad mix (or buy it pre-made)
  • 20 snack-sized bags of carrots, celery sticks, grapes, cauliflower florets, cucumber slices, etc... pick your favorites, but these are great to have to take to work or to a game, movie, etc 
  • 1 pint of homemade Paleo mayo (I use this in chicken or tuna salad, on burgers and mix it with hot sauce to put on fries and veggies...you can also use it make Whole30 dump ranch)
I usually cook in the same order - but you can do whatever feels right for you and the size of your kitchen.

I start with bacon...because why not?  I use it breakfast casseroles, salads and to top baked sweet potatoes...so I fry up the entire package.  I cut mine into lardons and cook over low heat so they don't burn and release all that wonderful bacon fat.  I use that fat to stir fry onions, peppers, garlic and tiny cubes of potatoes (and anything else that wants to be sauteed in bacon fat!!!) to use for my breakfast casserole and scrambles or hash later in the week.  I make a LOT...if I'm turning on the stove or oven - I'm cooking!


Aside from the bacon skillet of love, my stovetop is for cooking the ground turkey in whatever form I want it for the week - it's just a matter of seasoning.  I use it to poach my chicken breasts.  I boil my root veggies for the mash 

Then it's on to the over!  And when I roast one thing in the oven, I find a way to fill all the space and roast a LOT of things!  Breakfast casserole bakes at 350, so do my meatballs.  Sweet potatoes bake at 400°, so does cauliflower rice and spaghetti squash.  PLANNING makes your life easier, your utility bills lower and your meal prep shorter!

The food process and I have a love/hate relationship - I love how easy it makes things, but I hate cleaning it.  But I use it every week to make homemade mayo.  I also use it for my root veggie mash and cauliflower rice.  I make the cauli rice first, the mash second and the mayo last because making mayo requires the heavy duty dishwashing cycle to get it squeaky clean!


I don't pre-cook my burger patties or sweet potato fries.  I freeze the burgers in individual freezer bags unless I plan to have them within a day or so and I place the chopped sweet potatoes in gallon zipper bags in the fridge.

I make one head of cauliflower into cauliflower rice and put half in the freezer and half in the fridge.  I do the same with the root vegetable mash and meatballs.

I use the poached chicken breasts for chicken salad, cubed chicken for salads or snacks and may even shred some and mix it with salsa to make Mexi-rice or "burrito bowls"

I spend about 5 hours in the kitchen when I meal prep, but it saves me so much time throughout the week and ensures I will have delicious, healthy food at every meal without sacrificing or being tempted to go back to my old, unhealthy ways.


Wednesday, November 4, 2015

"Sausage" Cauliflower, Jalapeno Fritatta

I was so busy on Sunday that, for the first time since converting to a PaleoPlus lifestyle, I didn't make a fritatta or egg muffins for quick grab-and-go meals.  We made it work - we ate fruit and nut bowls, cubed chicken with guac (the longer I eat PaleoPlus, the less I adhere to the guidelines I grew up with for breakfast!) and today I made banana-berry coconut milk smoothies...those were a hit!

So, since I have no deadlines today - just a flow of activity in my kitchen, I decided to try and duplicate or get in the neighborhood of a fritatta I saw on Instagram a week or so ago - I decided to do a little mid-week meal prep and make a sausage, cauliflower, jalapeño casserole.

I put "sausage" in quotes because what I had on hand was a mixture of a little less than a half pound of ground beef/ground pork combo.  I think of sausage as pork exclusively.  I spiced it up and added finely chopped fennel seed (the other must in sausage for me) and then sauteed up a bunch of veggies in the sausage fat.

I made a smallish one...cuz with recipes that you make up on the fly - you don't want too much of an unknown thing!  I did keep my trusty notepad at my side and wrote down what I did - just in case!

Boy, am I glad I did!!!

I am pretty sure this is the best fritatta to come out of my oven!  I ate two pieces for lunch and plan on finishing it up with my family for dinner!  It was spicier and had more fillings than the casseroles I've made before.  I used less eggs and more meat and veggies.  Perfection!


Here's the recipe:

To make the sausage...
1 pound ground beef/pork mixture (or all ground pork)
1 1/2 t ground fennel seed
1 T smoked paprika
1 t cayenne
1 t turmeric
1 t garlic powder
1 t onion powder
1 t cumin
1 t red pepper flake
1 T sea salt
2 cloves finely minced garlic

Brown the sausage in a non-stick pan over medium-high heat.  Once the sausage is cooked through, add the all the spices and garlic and stir to combine.  Reduce heat and let the meat cook for about 3-5 minutes, stirring frequently.

To make the veggie filling...
1/2-1 finely chopped red onion
1/4 jalapeño, finely chopped with ribs and seed removed
1 bell pepper (I used 1/2 red and 1/2 yellow) chopped
1/4 head of cauliflower, finely chopped

Once the sausage is cooked, remove the meat to a platter or bowl, leaving the fat in the bottom of the pan,  Add 1 T of ghee to the pan and melt over medium heat.  Add the chopped veggies, cooking until they are cooked through and translucent, about 10 minutes.  Once the veggies are cooked through, add the sausage back into the pan and combine.  Taste for seasoning and add salt or pepper or spice to suit your palate.  This needs to cool to room temperature.

In a large bowl, crack 9 large eggs, add 1/4 cup of full-fat coconut milk and whisk to combine.  Add a pinch of sea salt.

While the filling is cooling, preheat the oven to 350³ and brush a 9X13 casserole dish with melted coconut oil so the fritatta doesn't stick.

Once the filling is cooled, pour it into the oiled casserole dish, spreading it evenly in the pan.  Pour the egg/coconut mixture over the top of the filling, stirring gently with a fork or spoon to make sure everything is combined.

Bake for 30 - 35 minutes, until the top and sides are browned and the center is set.

I served mine with guacamole and after taking one bite, I went ahead and got a second square!!!

Enjoy!


Tuesday, November 3, 2015

Congratulations...Brace Yourself!


First of all - to all of us who have made it through our first 2 days of CleanLeanMean15 - CONGRATULATIONS!  The first day is easier than the second day - it's new, it's exciting, it's promising and then on the second day it gets REAL.  The first time I did this - day two was my "thumb sucking day"...poor me...poor no Coke Zero me. 

Anyway, congrats on making it through the "feel sorry for yourself" day.

I went back and looked through the bit of journaling I did during my first 30 days of strict Paleo eating and found that Day 3 or Day 4 is the "Headache Day".  I believe I described it this way...

oh.  my.  goodness…. it’s here.  The headache I was properly warned of in all written info on the Whole30.  It’s not a migraine.  It’s not debilitating.  It’s just a dull thudding behind and between my eyes.  Apparently, I am detoxing from the demon sugar.  Or the demon carbs.  Or the demon dairy. Some demon is surely responsible!

I woke up fine, but before I had both kids to school...BAM!

So, here's my gift to you.  From one 3-time squeaky clean eater to all you new squeaky clean eaters...take a Tylenol when you get out of bed.  Just one.  And take one throughout the day (you know your tolerance - if you can't or don't take pain relievers - don't take one.   If you you'd rather wait until you have the headache...that's fine too!...This is where I mention that I am NOT a doctor or nutritionist or headache specialist, just someone sharing their personal experience). 

Why suffer the headache?  You made a conscience choice to remove all the bad stuff from your diet.  You are cleaning house.  You are making choices.  You don't need your body to send you a "signal" that you need to change.  So nip that headache in the bud.  Take a Tylenol before it grabs you by the eyebrows and won't let go...that is just my opinion, not medical advice, but I REALLY wish someone had suggested that to me before the demon sugar/carbs/dairy had taken hold of my brain and squeezed!

In my family, some of us got the headache on Day 3, for others, it was Day 4.  As I said - it wasn't debilitating, but it made me tired.  And cranky.  And want to crawl back into bed. 

The Whole30 website says "Many Whole30'ers report headaches, fatigue and general malaise during this part of the program (Day 3).  This, my dear, is completely normal.  Your body is working it's way through a whole host of junk it stored from the food (or food-like products) you used to eat.  This process lasts a day for some, but for others it can take longer."

If you binged on everything you'd be giving up right before starting - you may be an extra day or two of blah.  Drink lots of water.  Eat a variety of foods.  And make sure you have more food than you think you will need - you really don't want to couple 'blah' with "Hangry".

My headache lasted one day.  I had some muscle aches the following day.  Physically, those were my only two negatives throughout my first 30 days of clean eating.  I still fantasized about wheels of Parmesan and swore I could hear the sound of someone opening a Coke Zero from about a hundred yards...but that only lasted 10 days or so. 

I was amazed at how quickly I broke my addictions to food.  How quickly I could be at a table with someone eating nachos and not want to bury my face in them and just inhale!

Trust me - it gets easier and easier, but these next couple of days may bring some uncomfortable physical milestones.  Stay strong.  Find support.  Enjoy answering questions and talking about your journey.  And find a few moments to jot down how you're feeling. 

Everyone's experience is different - especially since all of us have a different history going into this 15 days of CleanLeanMean eating.  But what an awesome gift you are giving yourself.  I'm excited to hear how everyone is doing/feeling/craving/behaving.  Keep up the great work!


Many Whole30ers report headaches, fatigue, and general malaise during this part of the program. This, my friends, is completely normal. Your body is working its way through a whole host of junk it stored from the foods (or food-like-products) you used to eat. This process lasts a day for some folks, but for others it can take a few days longer. Relax, drink a lot of water, and keep making good choices. - See more at: http://whole30.com/2013/08/revised-timeline/#sthash.ZHoaeViS.dpuf

Monday, November 2, 2015

Getting Our Arms Around Clean Eating

This week a group of us are embarking on 15 days of squeaky-clean eating.  We are eating Paleo minus ALL sugars.  That requires a commitment, because sugar is hiding in everything! 

I remember (and frequently tell the story) of the day my husband and I tried to find a boxed chicken broth or stock that was sugar free...really????  Sugar in chicken broth???  I had no idea.  AND it took us 3 stores to finally find a free-range, organic, sugar free chicken broth.  And the store is not at all convenient to my house.  Figures!

My point is - you have to shop differently.  You have to re-learn how to read labels. 

I've always looked at 3 things on a label - the calories, the sugar grams and the sodium.  I don't know that I ever looked at the list of ingredients.  I am positive I never read the list from start to finish.  I didn't know all the different ways they could list sugar and artificial sweeteners on a label.  I didn't know what a nitrate was or why I should avoid them.  At first I confused added sugar with the grams of sugar in an item.  Now, I look at the list, not the nutritional section.  Some sugar is natural and not added to a product. 

I am a vigilant label-reader these days.  And, I have become such a knowledgeable shopper that I know what I need from which store and what is a good vs. a GREAT price for all my favorite items.  And I know what is in all of the items I buy.  And it only took a couple of months of shopping and living Paleo to become an expert.

I am certain I have said this before - but when I purchase something packaged, I look for things with very few ingredients AND ingredients that are recognizable and easy-to-pronounce.  That will get you away from chemicals and additives and preservatives and many of the artificial sweeteners that are lurking in our food.

The easiest Paleo shopping trick is to buy fresh produce, proteins, nuts and seeds.  They have ONE ingredient.  Whatever you're buying.  The only thing in an avocado is avocado.  The only thing in cauliflower should be cauliflower.  Chicken should only be chicken. 

Buying fresh ingredients means more cooking.  And, just like shopping - you have to learn to cook a little bit differently.

I have given up all the cheaper, unhealthy, highly processed oils in favor of avocado, coconut and organic olive oil and ghee for cooking.  These oils benefit my body and don't cause harm.  Healthy fats - who knew?! 

We love Asian cooking, so we substitute coconut aminos for soy sauce.  Same great taste, but no adverse effects on my digestive system or my son's complexion! 

I splurge for cage-free eggs and I eat almond butter instead of peanut butter.  I make my "rice" out of cauliflower and I use lettuce leaves or sweet potatoes as the "bread" for my chicken salad sandwiches.  My kid's lunches are "weird" (according to them), but they never come home from school complaining of headaches or tummy aches, which makes weird perfectly fine!

It took me 2 or 3 months before I found my PaleoPlus system for shopping and cooking.  It took another  month or so to try and tweak the recipes I found on Pinterest or Instagram or the internet.  And now, I have my arms all the way around Clean Eating. 

I don't have to think about it.  I am not tempted by non-compliant foods in my home - because they aren't IN my home anymore! 

I have my 2 or 3 go-to emergency meals (chopped veggies and fruit with 2 T of almond butter, scrambled eggs with a tossed green salad, fruit and nut bowls - which is just a sliced banana with a handful of frozen or fresh berries, topped with some almond milk and a few nuts and seeds for crunch and Boar's Head beef salami rolled around pear slices or cubes of cantaloupe.)  These all take less than 10 minutes to prepare and include ingredients I always have on hand.

I also keep homemade meatballs, soup or chili and cauliflower rice in my freezer at all times!  Tired and hungry cannot tolerate an empty fridge or a clean eater without a plan.  The drive thru or frozen pizza will win if you don't stay prepared.

You can't expect to be an expert at PaleoPlus eating right away.  All you have to do is commit to a new way of eating for all the right reasons.  That commitment should keep you from getting discouraged or giving up while you learn develop your own PaleoPlus system.  You can do this!


Sunday, November 1, 2015

Poached Chicken Breasts

By the time I was old enough to learn to cook, my mother had kind of given it up!  We owned two businesses and she was the foundation of the "business" part of both of them.  Suffice it to say - she had other things on her mind!

But, we still had to eat!

So we had a few go-to meals (just like the rest of the world) that we had almost every week.  Shake 'n Bake pork chops with mashed potatoes, vegetable soup, chili (my mom made the BEST chili) and several different chicken casseroles or stove top stir fry/kitchen sink/whatever-we've-got kind of dishes!

Which means that every week she poached a bunch of chicken breasts.  She used them for all of the above chicken dishes and she made chicken salad to take in her lunch nearly every single day.

So, I may have been too late to learn her homemade sourdough biscuit recipe, but I knew how to poach a chicken breast!

I've made a tweak or two here and there and I've tried a few other methods, but when I'm meal prepping for a busy week - I go right back to how I learned it from mom.  So, on this one-year anniversary of her going to heaven to be with my Daddy - I wanted to share her technique for really lovely, perfectly poached chicken breasts.

Now, mom was a Depression-era child, so she was all about modern conveniences and the "value pack" of almost everything - so, I learned how to poach boneless, skinless chicken breasts.  You can absolutely use bone-in, skin-on - it does add a richness, but today it's all about honoring Peggy, so I am using the family pack of boneless skinless chicken!


4 boneless, skinless chicken breasts (use as many as will fit snugly in the bottom of your pan)
A handful of celery tops (I save mine from when I cut celery sticks for snacks) or 2 ribs of celery cut in half
Fresh parsley - for 4 breasts, I use 3 sprigs
Fresh thyme (if you have it, if not 1 T of dried thyme) - 3 springs
Lemon slices (optional)
2-3 bay leaves
1/2 t peppercorns
1 t Kosher salt

*you can also add carrots, onions, different spices and herbs...make this your own!

Pour 1/2" of water into the bottom of your pot, then add the chicken breasts (they should fit snugly) and cover with enough water that they are submerged by 1" (does that make sense? - the water should be 1" over the top of the largest chicken breast). 
Add the celery, parsley, thyme, bay leaves, peppercorns and salt.
Turn heat onto medium-high and bring to a simmer (you'll see bubbles around the side of the pan, but it won't be boiling).
Turn your heat down to medium-low - it should keep the water simmering, but not boiling.
Mom always stayed close to the pot and skimmed any foam off the top, since we saved the broth to use for her soup and chili.  I do the same!
Continue to simmer for about 12-15 minutes (use an instant read thermometer and turn the heat off when the breasts are at 160°. 
Transfer the chicken to a heatproof bowl and using a strainer to catch the herbs and peppercorns, strain the hot liquid over the chicken and let them cool.
You can use the cooled chicken right away or store in the fridge for up to 3 days.
I put the broth in freezer bags and use for soups and chili - just like mom!